

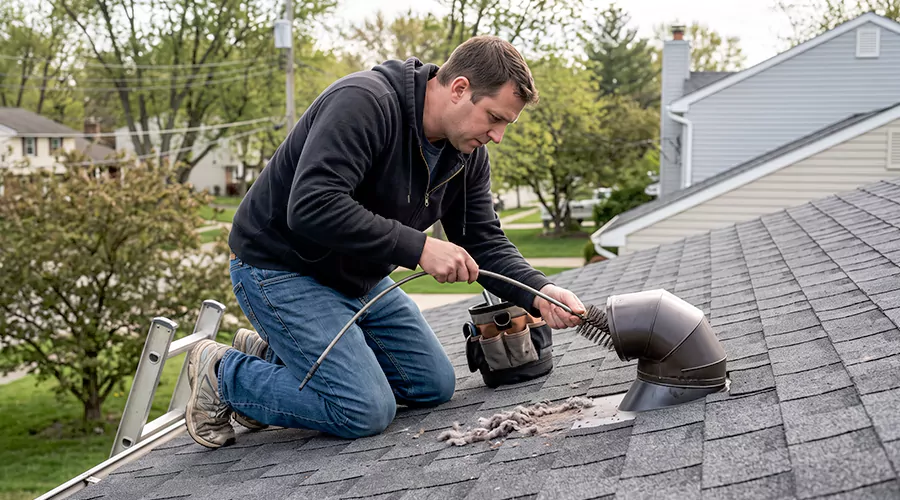
Cleaning a dryer roof vent involves removing lint from the exhaust duct and checking the rooftop termination for debris or a blocked damper. The indoor portion may be accessible with a dryer-rated cleaning kit, but reaching the roof termination should generally be handled by a qualified professional. In 2026, roof dryer vent cleaning commonly costs $150 to $250 in the United States.
Some homes exhaust dryer air vertically through the roof instead of through an exterior wall. This arrangement may be necessary when the laundry room is located far from an outside wall or on an upper floor. Although properly designed roof exhaust systems can operate effectively, their height and concealed duct routing make inspection and cleaning more difficult.
As clothes tumble, loose fabric fibers enter the dryer's airflow and some pass through the lint filter. These particles can settle inside the vertical duct or accumulate near the roof termination. Over time, buildup can restrict airflow and cause the dryer to take longer to remove moisture from laundry.
Roof vent cleaning requires attention to the full exhaust path rather than only the opening above the roof. Understanding where lint collects and which areas can be reached safely helps prevent incomplete cleaning or damage to the exhaust system.
Why Do Dryer Roof Vents Need Cleaning?
Dryer roof vents need cleaning because lint gradually accumulates inside the exhaust passage and around the outdoor termination. The lint filter captures much of the material released by clothing, but it does not remove every particle. Some fibers continue moving upward with the warm exhaust and may settle along the duct.
Vertical exhaust systems can be more difficult to inspect than short wall vents. The duct may travel through a ceiling or attic before reaching the roof, leaving few accessible points between the dryer and termination. If the outlet damper becomes obstructed, the restriction can affect the entire system.
A dirty roof exhaust can cause longer drying cycles because warm, moisture-laden air cannot leave the appliance efficiently. Restricted airflow may also contribute to overheating. The U.S. Fire Administration identifies failure to clean as a leading contributing factor in residential dryer fires, which makes exhaust maintenance an important safety task.
What Causes Dryer Roof Vents to Become Clogged?
Lint buildup is the main cause of a clogged dryer roof vent. However, duct design and the condition of the roof termination influence where material accumulates. A long exhaust run or damaged damper may create restrictions even when the lint filter is cleaned regularly.
Lint Escaping the Dryer Filter
Dryer filters capture loose fibers during each laundry cycle, but very fine material can pass through the screen. Those particles travel into the exhaust duct and may collect at joints or bends. Repeated use gradually adds more lint to the same locations.
The amount of buildup depends partly on laundry volume and fabric type. Towels and other materials that release substantial fibers can contribute more lint than some tightly woven clothing. Cleaning the lint screen every load helps reduce the amount entering the exhaust, but the duct still requires periodic maintenance.
Long Vertical Exhaust Runs
Some roof vent systems have a relatively long route between the appliance and the outside termination. As the passage becomes longer, resistance to airflow increases. Additional bends can further reduce the dryer's ability to carry lint all the way outdoors.
Not every vertical duct is excessively long, and length alone does not mean the installation is defective. The approved configuration depends on the dryer manufacturer's instructions and applicable code. However, long routes can be harder to clean thoroughly because household tools may not reach every section.
Sharp Bends Near the Roof
A roof vent may include an elbow that changes the direction of airflow before it exits the building. Lint can collect near bends because the exhaust changes direction and some particles settle against the duct surfaces. An accumulation near the upper termination may gradually restrict the passage.
This location is difficult to inspect from the laundry room. A cleaning brush may reach part of the duct without fully clearing material trapped near the roof. A professional may need to access the termination directly to evaluate the damper and remove remaining debris.
Blocked Roof Vent Dampers
A dryer roof termination should allow exhaust to escape while helping prevent unwanted outdoor air and water from entering when the appliance is off. A damper that becomes stuck or obstructed by lint can restrict airflow. The dryer may then operate longer to dry an ordinary load.
The damper must be compatible with dryer exhaust because unsuitable coverings can collect lint. Mesh screens should not be installed across dryer exhaust terminations. A damaged roof hood may need repair or replacement rather than repeated cleaning.
Debris or Pest Activity
Exterior terminations can sometimes collect leaves or other debris, depending on the roof design and surrounding environment. Animals may also attempt to enter a damaged opening. Nesting material can create a sudden obstruction that differs from gradual lint accumulation.
If active wildlife or protected nesting birds are present, removal may require specialized assistance. Pushing debris farther into the exhaust can make the blockage worse. The roof termination should be restored to a configuration that allows unrestricted discharge while limiting unwanted entry.
What Are the Warning Signs of a Clogged Dryer Roof Vent?
A blocked roof exhaust commonly causes symptoms similar to other dryer vent restrictions. The appliance may require additional time to dry clothing or become unusually hot during operation. These symptoms suggest a ventilation problem but do not identify the exact location of the blockage.
Watch for these warning signs:
- Clothes remain damp after an ordinary drying cycle.
- The dryer requires repeated cycles for normal loads.
- The appliance cabinet becomes unusually hot.
- A burning smell develops during operation.
- The dryer stops unexpectedly because of a possible overheating condition.
- Warm, humid air accumulates in the laundry room.
- Lint buildup is visible near accessible exhaust connections.
- Airflow remains weak despite cleaning the lint screen.
- The transition duct behind the dryer becomes unusually hot.
- Cleaning near the dryer fails to correct slow drying.
The symptoms may also involve an appliance malfunction or damaged transition duct. Checking the accessible exhaust connections helps determine whether a simple local restriction exists. If the passage remains blocked, the rooftop section may need inspection.
If the dryer overheats or produces a burning smell, stop using it until the cause has been addressed. Continued operation can increase fire risk. If smoke or fire is present, evacuate and contact emergency services.
How Is a Dryer Roof Vent Different From a Wall Vent?
A roof vent discharges exhaust through the roof, while a wall vent releases air through an exterior wall. Both systems should carry moisture and lint outside the building. Their main differences involve routing and accessibility.
| Feature | Roof Dryer Vent | Wall Dryer Vent |
|---|---|---|
| Exterior location | Roof surface | Outside wall |
| Common duct route | Often vertical | Often horizontal or relatively direct |
| Termination access | Requires roof-safety precautions | Often accessible from ground level |
| Cleaning difficulty | Can require longer tools and roof access | Frequently easier for short runs |
| Common concerns | Upper bends and roof damper | Exterior flap and wall duct |
| Typical professional cost | 150–250 | Often 80–185 for standard cleaning |
A roof termination is not automatically an incorrect installation. Some manufacturers permit roof venting when the route meets their requirements. However, a short wall outlet is often easier to maintain when a suitable routing option exists.
The exhaust must terminate outdoors rather than inside the attic. A duct that ends beneath roofing materials or releases warm dryer air into an attic is not an acceptable substitute for a proper roof termination.
Can You Clean a Dryer Roof Vent From Inside the House?
Some accessible portions of a roof dryer exhaust can be cleaned from inside the house. The dryer connection may provide an entry point for a suitable vent-cleaning brush. However, reaching part of the duct does not guarantee that the rooftop termination and upper elbow are clear.
The distance to the roof and number of bends determine whether an indoor cleaning tool can travel through the complete passage. A long vertical run may require more extensions than a typical household kit provides. Using an undersized or unsuitable brush can also leave sections insufficiently cleaned.
The most practical household task is often removing accessible lint near the dryer and inspecting the transition duct. A qualified cleaner can then address the concealed upper sections and rooftop hood. This division of work avoids climbing onto a roof or forcing cleaning equipment through an unfamiliar duct route.
How to Clean a Dryer Roof Vent Safely?
The safest approach combines indoor preparation with professional cleaning of the roof termination and difficult concealed sections. Homeowners may be able to clean the filter and reachable exhaust entrance. Roof access and removal of stubborn upper obstructions require equipment and precautions that go beyond ordinary household vent cleaning.
Step 1. Turn Off the Dryer and Disconnect Power
Switch off the dryer and allow it to cool. Disconnect electrical power before accessing the exhaust connection or inserting a cleaning tool. This prevents the appliance from starting while the ventilation system is open.
Gas dryers require additional caution because moving the appliance may strain the fuel connection. Do not disconnect gas piping merely to reach the exhaust duct. If the appliance cannot be accessed without disturbing the gas line, arrange qualified service.
Step 2. Identify the Roof Exhaust Route
Determine whether the dryer exhaust actually terminates on the roof. The duct may run vertically behind the laundry room wall and continue through the attic before reaching the rooftop hood. Building plans or an existing inspection record may help identify the route.
Do not mistake plumbing vents or other roof penetrations for dryer exhaust terminations. Several pipes and hoods may appear similar from the ground. Correct identification matters because opening or blocking the wrong component can create unrelated building problems.
Step 3. Clean the Lint Filter and Accessible Housing
Remove lint from the dryer screen and inspect the filter housing. Use a suitable brush or vacuum crevice attachment to collect debris that can be reached without opening internal equipment. Follow the dryer manufacturer's maintenance instructions.
Check that the screen is undamaged and fits correctly. A missing or broken lint filter can allow additional fibers into the exhaust. Cleaning the housing improves ordinary maintenance but does not replace removal of deposits farther up the roof duct.
Step 4. Inspect the Transition Duct
If the connection can be safely accessed, check the transition duct between the dryer and the permanent exhaust passage. Look for crushing and sharp bends that could restrict airflow. A damaged connector may require replacement even when the roof duct is relatively clear.
The transition duct should be approved for dryer exhaust service. Plastic and unsuitable foil-style hoses should not be used as substitutes for proper venting materials. Avoid pushing the dryer against the connection after inspection because it may crush the duct.
Step 5. Remove Safely Accessible Lint
An appropriate dryer-rated brush and vacuum may be used to remove lint from a reachable exhaust entrance. Work slowly and follow the tool manufacturer's directions. Avoid forcing extension rods through sharp bends or heavy obstructions.
If the brush begins binding or cannot advance normally, stop rather than applying greater force. A stuck rod or detached brush head can create a new blockage. Cleaning tools should not be forced toward the rooftop damper when the termination design is unknown.
Step 6. Have the Roof Termination Inspected
A qualified professional should inspect the rooftop hood using appropriate roof-access equipment. The inspection should determine whether lint is trapped around the damper or upper elbow. Any debris should be removed without damaging the cap or surrounding roof materials.
Roof pitch and weather conditions can make access hazardous even for experienced workers. Cleaning may also require working near delicate roofing or flashing components. The roof termination should not be dismantled casually because improper reinstallation may create water leaks.
Step 7. Clean the Complete Exhaust Passage
A professional may use specialized brushing and collection equipment to clean the vertical duct. Depending on the installation, access may be available from the appliance side or the rooftop opening. The cleaning method should suit the duct construction and avoid separating concealed joints.
The entire passage should be evaluated rather than assuming lint has collected only at the outlet. Long runs and elbows can hold debris at several locations. A major obstruction should be removed and collected rather than pushed into another section.
Step 8. Check the Damper and Roof Hood
After removing accumulated lint, the rooftop damper should move as designed. The termination should allow exhaust air to leave without a mesh screen that catches fibers. Any damaged or unsuitable hood should be evaluated for replacement.
The inspection should also check that the termination has not been damaged during cleaning. The roof penetration must remain properly protected against water entry. Cleaning the exhaust is not complete if the surrounding roof assembly has been disturbed and left unsealed.
Step 9. Reconnect the Dryer and Verify Airflow
Reconnect any exhaust components that were accessed during cleaning using approved fittings. Restore power only after the system is properly assembled. Run the dryer according to the manufacturer's instructions and check for normal operation.
The technician may use an appropriate airflow measurement method to verify the result. The rooftop damper should open during operation, and the dryer should no longer show symptoms of restricted exhaust. If overheating or slow drying continues, the appliance or another duct section may require investigation.
What Tools Are Used for Roof Dryer Vent Cleaning?
A roof dryer vent may require tools designed to reach a longer concealed passage. Specialized brush systems and vacuum equipment can remove lint from areas that household attachments cannot reach. Safe access to the roof also affects the equipment needed.
| Equipment | Purpose |
|---|---|
| Dryer vent cleaning brush | Loosens accumulated lint |
| Extension rod system | Reaches longer duct sections |
| Suitable vacuum and collection equipment | Collects loosened debris |
| Inspection camera | Examines difficult-to-see duct areas |
| Airflow measurement equipment | Helps assess exhaust performance |
| Approved roof-access and fall-protection equipment | Provides safer access to rooftop termination |
| Replacement dryer vent hood | Restores a damaged termination when necessary |
Tools should be compatible with the vent's diameter and layout. A rotating brush may damage a weak duct or become stuck around an elbow when used incorrectly. The cleaning method should be selected after identifying the exhaust configuration.
Why Should You Avoid Cleaning a Dryer Vent From the Roof Yourself?
Roof work introduces fall hazards and the possibility of damaging roofing materials. A dryer vent cap may be positioned near steep surfaces or difficult roof edges. Reaching it with a household ladder does not automatically make the task safe.
Removing the roof hood can also interfere with flashing or sealing around the penetration. Improper reinstallation may allow rainwater into the attic or ceiling cavity. The repair could then involve more than the original lint blockage.
Another concern is the duct itself. A cleaning rod pushed downward from the roof can become stuck or damage a connection if the passage has an unexpected bend. A qualified professional can select a suitable access point and determine whether the termination needs to be opened.
Homeowners can still complete useful tasks from safer locations, including cleaning the lint filter and documenting drying problems. Leaving rooftop access to trained personnel avoids turning routine maintenance into a fall or roof-damage hazard.
How Much Does Roof Dryer Vent Cleaning Cost in 2026?
Professional roof dryer vent cleaning typically costs $150 to $250 in the United States during 2026. The price is generally higher than cleaning a short ground-level vent because roof access and longer ducts can increase labor. A heavy blockage or damaged roof hood may add to the expense.
| Service | Estimated 2026 U.S. Cost |
|---|---|
| Standard accessible dryer vent cleaning | 80–185 |
| Roof dryer vent cleaning | 150–250 |
| Standalone vent inspection | 30–60 |
| Cleaning involving bird nest removal | 120–250 for some projects |
| Replacement of a damaged vent termination | Depends on roof access and material |
These costs represent different scopes and should not automatically be combined. A standard roof cleaning may already include clearing the exterior hood. A separate repair charge may apply when the hood or duct must be replaced.
The contractor's estimate should explain whether the full vertical passage will be cleaned and whether safe access to the roof is included. A quote covering only the lint near the dryer is not equivalent to a complete roof exhaust cleaning.
How Often Should a Roof Dryer Vent Be Cleaned?
Annual cleaning is a useful starting point for roof dryer vents, consistent with U.S. Fire Administration guidance for dryer vent ductwork. However, some roof systems may need more frequent attention because of long runs or heavy laundry use. The interval should reflect actual buildup and drying performance.
The lint filter still needs cleaning every load. A clean screen reduces the amount of fiber entering the exhaust, but it does not eliminate buildup inside the vertical passage. Periodic attention to the exterior termination is also important because the damper may become restricted.
If clothes suddenly take longer to dry or the dryer becomes unusually hot, do not wait until the next annual cleaning. Stop operating the appliance when a significant blockage or overheating condition is suspected. The exhaust should be evaluated before further use.
What Mistakes Should You Avoid With Roof Dryer Vents?
Incorrect cleaning methods can leave debris inside the duct or damage the exterior termination. The most common mistake is assuming that removing lint near the dryer clears the full vertical passage. Another is trying to reach the roof without suitable fall protection.
Avoid these mistakes:
- Climbing onto a steep or wet roof without appropriate training and equipment.
- Forcing long brush rods through unknown duct bends.
- Pushing a heavy obstruction farther into the exhaust.
- Operating the dryer while the exhaust is disconnected.
- Installing mesh screening across the roof termination.
- Replacing a dryer-rated roof hood with an unsuitable attic or bathroom vent.
- Disturbing roof flashing without restoring weather protection.
- Using plastic exhaust ducting in place of approved metal materials.
- Continuing to run a dryer that overheats or smells burnt.
- Assuming a cleared outlet means the entire duct is clean.
A dryer exhaust should remain separate from other ventilation systems and discharge outdoors. It should never terminate inside the attic. If inspection reveals an improper installation, correcting the route may be necessary in addition to removing lint.
When Should You Call a Professional?
Professional cleaning is recommended when a dryer vent terminates on the roof and the exterior opening needs attention. A long vertical duct and persistent airflow restrictions also justify specialized service. The technician should have experience cleaning dryer exhaust systems and safely accessing rooftop terminations.
A professional can inspect the damper and determine whether an internal blockage or damaged duct is preventing normal airflow. The service should address the full exhaust path rather than only the most accessible opening. Any repair proposal should identify the damaged component and explain why replacement is needed.
If slow drying continues after a complete cleaning, the dryer itself may require appliance service. A clear exhaust does not rule out mechanical problems inside the appliance.
How Can You Prevent Roof Dryer Vents From Clogging?
Preventing excessive buildup involves maintaining the lint screen and keeping the exhaust route in good condition. The vent should remain connected and free from unnecessary bends or compression. Routine inspections help identify problems before airflow becomes severely restricted.
Clean the Lint Screen Every Load
Remove accumulated fibers before or after every drying cycle. Inspect the filter for damage and replace it if it no longer fits properly. A clean filter helps reduce the amount of lint entering the exhaust.
Maintain the Transition Duct
Check the accessible connection behind the dryer for crushing or sharp bends. A damaged transition duct can restrict airflow before it reaches the vertical passage. Use only approved dryer exhaust materials.
Keep the Roof Termination Suitable for Dryer Exhaust
The rooftop hood should have a functioning damper and remain free from lint-trapping screens. Have damaged components repaired with products approved for dryer exhaust. Proper roof weather protection should also remain intact.
Follow a Regular Cleaning Schedule
Plan full-system cleaning approximately once a year or sooner when symptoms appear. Keep a record of the service date and any repair findings. Recurring obstructions may indicate that the vent route or termination needs further evaluation.
Conclusion
Cleaning a dryer roof vent requires removing lint from the exhaust duct and inspecting the rooftop damper. Indoor sections may be accessible, but roof work should generally be handled by a qualified professional. Proper cleaning helps restore airflow and reduce lint-related fire hazards. Roof terminations also need suitable weather protection and an unobstructed discharge path. Start by checking when the roof dryer vent was last cleaned and whether drying times have increased.